Sewing How-To | Easy Baby Quilt
Let me preface this post by saying that I am not a seamstress. I just wrote ‘sewer’ and realized it looked like the sanitary system, sewer, so now I realize why we don’t write that for a person who sews. *doh* Ok, back on track here. My sewing abilities began in 8th grade Home Ec in the form of a square pillow. I sew squares, folks. That’s it. I had a brief run in with a blouse that just did not work out. My mom worked with me on it but I finished back at home in Florida and I just didn’t like how it turned out. Maybe another pattern another time.
So, yes, I sew squares. Simple things. Before I begin this how-to let me say that you should know how to sew, use a machine, thread a needle and all that. I’m not walking you through those kind of basics. I’m sure a Google search will help you do that.
As for the time to finish this, really only a couple of hours will do the trick. If I sat down and did it straight, maybe 2-3 hours and it would be whipped up.
Here we go!
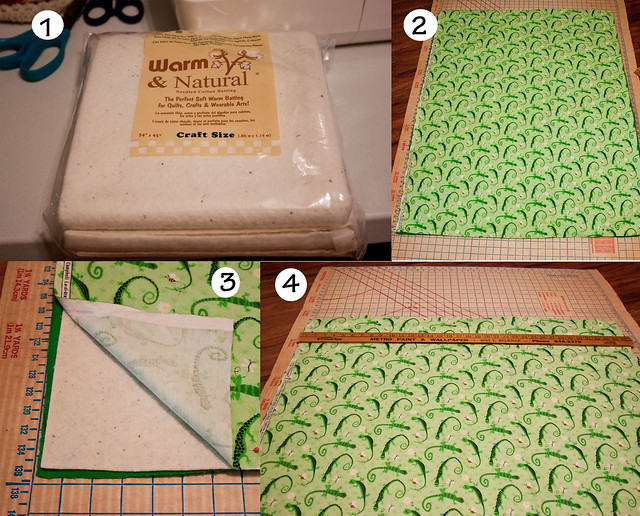
1: These are baby sized blankets so I go for the craft size quilt batting which is 34″ x 45″. It’s a manageable size for me. Quilt batting comes in different forms, acrylic and cotton, but I love the Warm and Natural craft batting because, well, it’s natural! It is also easy to work with.
2: Pick some fabric! I like a print on top and plain color on the bottom. But you can do what you want. This blanket was fleece material but regular cotton fabric works too. I buy a yard and a half of each but I’m thinking a yard and a quarter will do better in the future so I am wasting less after I trim.
3: I lay everything out on a cardboard cutting board thing-a-ma-bobber. You can lay it out on the floor or a large kitchen table, too. Lay the plain color on the bottom, then spread out your batting and finally the print on top. You will probably have to adjust as needed, making sure the material is straight and smooth. I didn’t do a photo for the next step, but the material you buy will be larger than the batting so you will need to trim along the edges to get rid of the excess material. I leave about a half inch extra for caution and trim that up after I’ve sewed the pieces together.
4: After everything is trimmed out, use a yard stick to help you get the number of lines you want on the quilt. It’s simple math, really. With width divided by the number of lines you want and that is the spacing in inches you need to make it. Then I just put in my pins down the length of that line, so say, every 8″ is what I’m working with I’ll put pins all the way down at 8″, 16″, 24″, and so on. I move the yard stick as I go to keep me in line, mostly eyeballing it. Do this for both the width and length of the fabric.
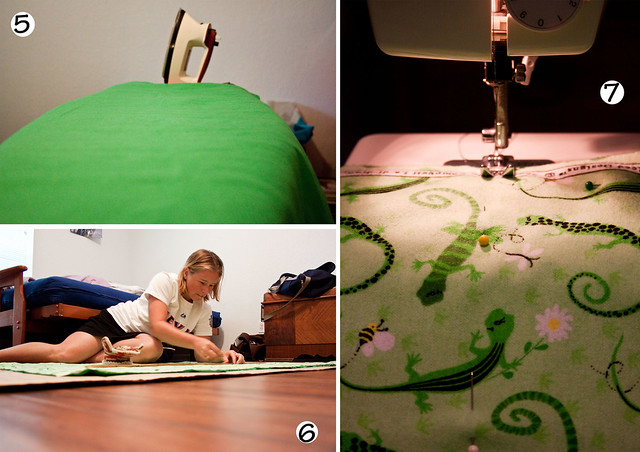
5: Really should iron the fabric beforehand to get the creases out but I did it after I’d pinned it. Either way works.
6: Working on putting the pins in.
7: Once the pins are in, you are ready to sew! It doesn’t matter if you start sewing length-ways or width-ways first. I prefer doing the shorter lines first as it is easier to work with. As you sew down, remove the pins or adjust them as necessary.
8: You can see the lines after it is finished.
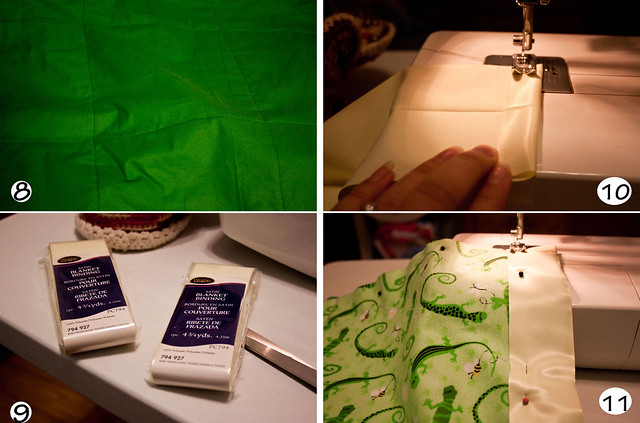
9: The next part is the hardest. The binding. I use Wright’s single fold satin binding because it is wide and easy. Frankly, I’d like to learn how to do binding better, but I’ll show you my way.
10: To start I fold over the first end and sew it up to prevent fraying. The website says it won’t fray when cut but I’m not that trusting!
11: Once the end is sewn I then pin the binding to the edge. This is why I use the wide tape because it is easier to work with! I’ve done smaller bindings before and had many headaches. Then sew down the tape, I stay about the width of the machine foot from the edge of the binding. But you could do less or more depending on how you are doing your blanket.
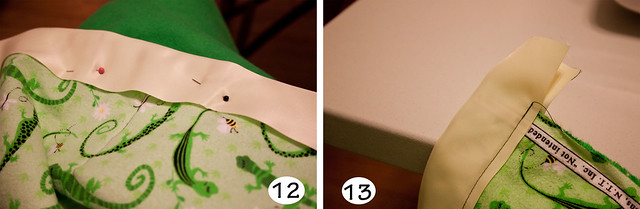
12: Should’ve thrown this one in the other set above, but this just shows how I have the binding pinned.
13: Once you get to the first end, sew to the edge of the fabric and then cut off the binding tape. Then repeat steps 10-11 until you come to the very last end, back where you started. To finish the last end you’ll fold up the binding tape again and sew up the end so that it isn’t showing like in step 10. Just sew that binding line until you are a few inches away from the end, fold the end under and in line with the edge of the blanket, pin it, and sew to the end.
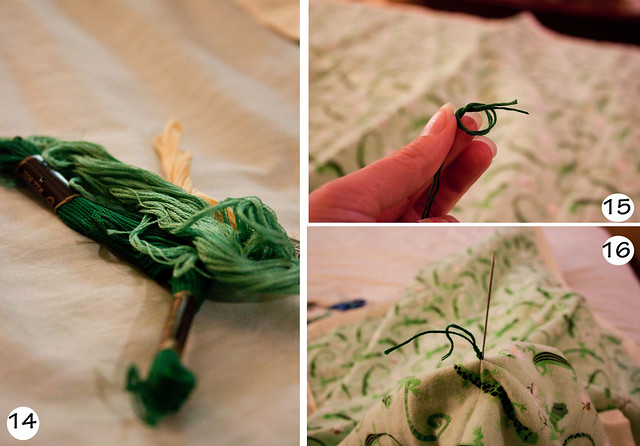
14: Now that the blanket is mostly compete, I like to add a little bit of frill to it. Using embroidery thread and an embroidery needle I add tassels to the line junctions in the blanket.
15: Thread the needle with the desired length of embroidery thread and make a knot at the end, leaving about an inch at the end. This will be the first tassel once you pull the needle through.
16: I like the tassels on the print side of things so I will insert the needle down through the square from here, leaving the first tassel through.
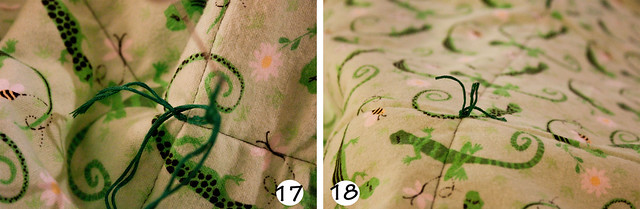
17: Then I repeat the same thing on the back side, just slipping the needle back through to the other side. I then make a knot around the first tassel and cut off the thread, making it even with the first length of tassel.
18: That’s it! There’s the tassel. You could add more colors if you want, too. Repeat at all the line junctions throughout the blanket.
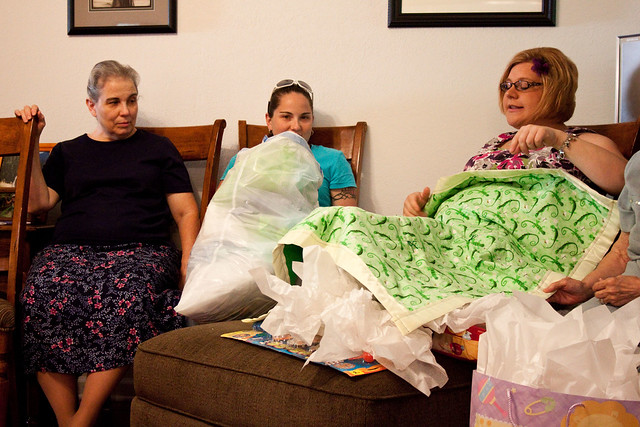
And then you give the blanket to your sister in law at her baby shower! Wa-la!
I hope this makes sense. If any of the directions are confusing at all feel free to email me and ask for clarification.
I love crocheting baby blankets but they take more time and if you are in a pinch for a nice, heartfelt baby gift, I think this is a great way to go. You can see I got more elaborate with my other niece Ashleigh’s blanket, and I thought I had photos of one I made for Zoe, I actually cut up squares for that one.
That’s it!
One Comment
chel
LOVE that print! Still terrified of the sewing machine 🙂